How do I clean my logs?
1. Exterior Cleaning Lightly cob blast, sandblast, sand, or pressure wash (the most often used method) new logs (see How To Power Wash Your Logs).
Why should you power wash new logs? As is true for most any job, proper preparation is as important as doing the actual job. This is certainly true for properly preparing the exterior surface of logs before applying stain to them. The leftover mill glaze* must be removed, and the surface should be slightly roughened to allow the stain to penetrate as deeply as possible. *Mill glaze is the stain-repelling film leftover from shaping the logs in the processing mill. One way to understand the importance of this step is to realize that it is very rare to ever have any failure of a coating applied to the cut end of a log. The log end is extremely rough in texture, and the coating has ample opportunity to penetrate and establish optimum adhesion. The goal of power washing is to stimulate the texture without dramatically affecting the log’s appearance.
When pressure washing, we suggest you used one of these cleaning agents if you will be applying either a water-based or oil-based finish: CPR, KleenStart Wood Cleaner, Log Wash, New Log Prep, X-180 Weathered Wood Restorer, or Bleach & Water: A mixture of one part household bleach and five parts water, plus one tablespoon TSP (Tri-sodium phosphate) per gallon (optional). Note: Log Maintenance Wash is best for cleaning logs that already have a finish. If you will be applying a Perma-Chink Lifeline finish, do not use bleach and water.
Bleach is a corrosive chemical irritant that can damage surfaces like skin and fabric. Never mix bleach and ammonia for any reason, the results can be fatal. Also, it is not recommended to mix bleach with other household cleaners that may contain ammonia or to mix bleach with vinegar. Vinegar and bleach will create a chlorine gas that is a toxic health risk.
Do not use household bleach as a cleaning agent for deck lumber that was treated with CCA (chromated copper arsenate) or more commonly known as "pressure treated lumber". This type of treated lumber was removed from the market by 2003. If your deck or landscaping timbers were made from this lumber, use an oxygen bleach like KleenStart Wood Cleaner instead of household chlorine bleach. Chlorine bleach when combined with CCA forms highly toxic chromium and arsenic compounds.
Apply cleaning agent from the bottom and work up. This will avoid streaking of the logs. Allow agent to stand 10-15 minutes before power washing.Rinse thoroughly. Allow to dry 3-7 days depending on drying conditions before applying stain. Be sure to thoroughly rinse the cleaning agent and allow the log surfaces to completely dry before applying a finish.
After cleaning, you will notice a woody pulp on the surface. This can be removed by hand with a 3-M stripping pad or a quicker method is using an Osborn Buffing Brush on an angle grinder or car buffer. Usually two brushes are required for a house. If you did not use a sap-stain control, you may notice sap-stain, a blue, red, or brown coloration deep in the wood. These are permanent stains and unfortunately can not be removed.
2. Interior Cleaning on the inside may be more messy than on the outside, if the house is already furnished. A general dusting may work, but to actually clean the logs, a sponge saturated with a bleach and water combination may be used. The logs will need to be rinsed, hence the messiness. A trough could be built to catch any of the dripping water when rinsing, or use another sponge with plain water. Otherwise, just a light sanding is necessary.
Tips for CleaningA Suggestion For Applying Cleaners Oxalic acids like OxCon and X-180 leave more color in the wood while chlorine bleach can blond the wood. If this happens, you may need to apply a pigmented finish to re-color the wood. Oxalic acid mixtures also help remove iron stains. This material leaves more of a golden color to the wood. Use an oxalic acid based cleaner if you will be finishing your logs with a solvent-based or water based finish, make sure the cleaner is thoroughly rinsed off. Neutralize the bleach with clear water, or the salts in the bleach could remain to feed future fungi. Use a more diluted mixture on softer, more porous woods like cedar. Example: use a mixture of 1 part bleach to 5 parts water. On heavily weathered wood, you may need to use a 1:3 mixture. If you choose to use TSP as a cleaner and use it in heavy amounts, it can pull out the reddish undertones in Red Pine (Norway Pine). This red undertone can react with yellow finishes to give stains more of an orange appearance. |
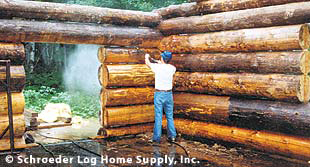
Power washing is shown being done on new construction.
Notice how loose bark, mildew, and graying is removed.
Power Wash Only The Exterior
The interior surfaces are not critical, since they see no exposure to extreme weather. To avoid damage to interior areas, power wash the logs in the yard before they are shipped to the job site. If it is not possible to clean the logs in the yard, it should be done early in the construction cycle at the job site.
Use A 1500 PSI Power Washer
Extremely high pressure is not necessary since you run the risk of tearing up the surface and leaving it with a "fuzzy" or "hairy" condition. This will not hurt the performance of the stain, but the appearance can be objectionable and can be buffed off with an Osborn Buffing Brush.
Use A Low-foaming Detergent
The detergent will assist the high pressure water in loosening and lifting all surface residues. Use hot water. Then rinse with cold water to flush any detergent from the surface. A garden hose works well for this.
Use A Fan Spray Nozzle
Apply the water at an angle so it does not spray back into your face (be sure to wear safety goggles). Hold the nozzle at a distance, just far enough away from the surface to avoid "fuzzing" up the outer layer of wood. At this distance, the water and detergent will impact the wood with tremendous force and will remove virtually all residues, as well as creating considerable micro-roughening of the surface for enhanced stain penetration.
Apply The Finishing Touches
If you will be applying a borate wood treatment like Armor-Guard, PeneTreat (Tim-bor), or Shell-Guard RTU, apply once the logs have become slightly damp after cleaning. Caulking the checks and cracks may be done at any time after cleaning is complete and the logs are dry.
Note: The most effective method for removing mill glaze and roughening the surface is cob or sand blasting. But for many, this approach is too expensive or impractical. If this is the case, power washing or sanding the logs will remove the mill glaze.
We Recommend Blasting If:
Sandblasting or Cobblasting can be done to remove the old finish that previously exists on your log home. Both methods are a solvent free way to remove finishes but remember that windows and trim need to be properly masked off to avoid any damage.
Cobblasting is an innovative way of stripping logs by using dried corn cobs instead of sand. Cobblasting is less abrasive than sand and can be used as mulch for a garden or around plants when the job is done (if the stripped finish doesn't contain any lead). Typically with sandblasting the sand has to be hauled away adding extra expense. Cobblasting won't pit the logs the way that sandblasting will (a light sanding is all that is required so that absorption of stain is more uniform) and so you can save time and expense by not having to sand the logs down so heavily. Because cobblasting is new to the market, it may be difficult to find someone who offers that service in your area.
Because sandblasting leaves the log surface with a pitted texture, it should be sanded down to bring the surface back. If you have your house professionally sandblasted, it would probably be wise to find out if the company has had previous experience with blasting log homes. The pressure required for sandblasting logs is considerably less than for blasting metal. You wouldn't want them to blast huge chunks out of your logs.
Cleaning Lightly cobblast, sandblast, sand, or pressure wash the new logs. When pressure washing, we suggest you use a cleaning agent.
Preservative Apply preservative (see PeneTreat (Tim-bor) or Armor Guard). Depending on type, some can be applied when the surface is damp. Oil preservatives will require dry wood.
Finish A pigmented coat of water repellent stain will last longer than clear. If the logs are dry (moisture content is less than 19%), apply the recommended number of coats of finish the first year. If the logs are green (moisture content is more than 19%), apply only one protective coat of finish the first year and follow up with additional coats the next year.
Caulk or Chink
Cleaning
Same as exterior, or wash by hand or light sanding. Interior may be wiped down more often, so a smoother surface may be desired.
Preservative
On the Interior, a preservative is optional on year-round homes but highly recommended to help deter insects on seasonal homes.
Finish
Clear finishes can be applied to the interior of the house. It is recommended to use a light pigmented stain if there is a lot of sunlight coming into the building. On dry wood (below 19% moisture) apply 1 to 3 coats to the logs to obtain the desired effect.
Caulk or Chink
On dry wood - Caulk in year 1.
Caulk or Chinking
Inspect the caulking before power washing and re-apply only where it is cracked or broken away from the logs. It is important to do this first so that when you power wash, you are not forcing water into the joints of your logs.
Cleaning
Pressure wash the logs with water. If the logs are sunburned see Avoid Peeling Finishes and Sunburned Logs. If the logs have not been restained for so long that they have turned gray, then we suggest you use a cleaning agent before the pressure washing:
Allow to dry 3-7 days, depending on drying conditions before applying stain.
Finish
A pigmented coat of water repellent stain will last longer than clear. Apply one to two coats.
Note: Water based stains can not be used over oil based stains, when in doubt, use an oil based stain.