Stains & Finishes FAQ | Avoid Peeling Finishes and Sunburned Logs
Clear Finishes? Know What To Expect | Considerations When Purchasing A Log Home Finish
Get The Most From Your Log Home Finish | How Much Log Stain Do I Need?
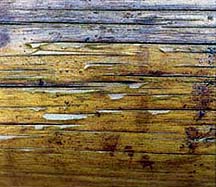
In this photo you can see the finish has blistered, cracked, and is starting to peel. This has happened because the finish has lost its adhesion. (Notice the top area where the log has become sunburned and turned gray).
One of the factors for peeling is the moisture content of the logs when they were coated. If the logs were too wet (20% or higher), the logs will continue to dry out and as they dry the resident moisture will move from the center of the log outwards to the surface. The moisture will form on the surface of the log between the finish and the wood. If the finish is very thick and heavy, a blister will form because the moisture can't pass through the barrier of the finish. If your logs are still quite green, we suggest that you apply only one coat of a log keeper finish, such as TM5 First Treat or Colorfast. This will give the logs some protection while still allowing the moisture to escape out through the one coat of finish. Once the logs have dried out to 19% or less, then you can apply your final finish. You can test the moisture content of your logs with a Moisture Meter. Also, moisture can also occur from checks holding water. When heat from the sun reaches and heats the log’s surface, the moisture is pulled to the surface causing a break in the wood-to-finish adhesion.
Any type of finish, either oil or water based can peel. Remember, it is the amount of finish build up that will provide the potential for peeling. Penetrating finishes tend to peel less because instead of acting like a plastic coating on the logs, they don't build up into one thick coating (less "plastic") thus, allowing moisture to escape out through the thinner coating. They do tend to weather away over time and will need to be recoated periodically to maintain their protective qualities.
The gray, sunburned area on the top of the log shown in the picture is a result of prolonged, direct sunlight. This can be prevented in new construction by extending the eaves and overhangs to allow for more protection from the sun. Also, avoid using clear finishes alone because they provide less UV protection from the sun. You could also plant shade trees to help deflect the direct sunlight.
If your logs are sunburned you can typically get by with sanding down the sunburned areas with 60-80 grit and then reapplying your finish. You will need to reapply the same number of coats as the rest of the wall to match the color of the rest of the wall. Tip: When you are reapplying the finish to match the rest of the wall it is better to apply too much and make the sanded areas look darker then to not add enough so they look lighter. The darker areas will tend to look natural where lighter areas will stick out and look distinctively unnatural.
Clear Finishes? Know What To Expect
We receive a lot of phone calls from customers across the U.S. who have either applied a clear finish on their log home or they would like to have one on their home. They want to keep the natural look of the logs.
Those who have already tried a clear finish are reporting they have to keep re-applying a finish every year or two. The cost and time are tremendous. The clear finishes alone offer very little protection from the sun’s ultra-violet rays. It is like going out on a hot day with no sunscreen. You burn from the sun and your dead skin then peels off. That is why we use sunscreen to protect ourselves from the sun. Debarked logs are not the natural look of logs; the bark protects them from the weather. If you ever noticed alongside the road a tree without bark, it turns gray from the sun, absorbs moisture from rain, and eventually the insects will infest the wood as rot takes place, returning the wood back to Mother Nature in the form of fertilizer.
Yes, this process may take awhile, but the starting process does not take long at all. For example, the more the moisture, the faster the process. Pigmented stains offer you protection from the harmful UV rays that break down your finish. They will absorb the UV rays and deflect them. Usually the top portion of your logs receive the most sunlight. Sun, moisture and insects are the biggest hazards to your log home. The UV rays break down wood fibers along with moisture, contributing mold, mildew and fungi to breaking down wood fibers. Insects see wood as a birthing place for larvae and a food source by drilling holes and eating wood.
Considerations When Purchasing A Log Home Finish
1. Are your logs green or dry? (19% or less moisture content is considered dry).
2. Does your house have large eaves, or lots of trees protecting the walls from the sun?
3. Is your house sitting out in the open at high altitudes with the sun beating on it all day?
4. Is there a high amount of humidity in your area?
These are questions that should be asked of you when purchasing a finish for your log house. All finishes are not of the same quality and there is probably one best suited for your conditions that will last at least 3-5 years.
When purchasing a log home, most owners are aware that there will be some maintenance, but having to redo a finish every 1-2 years is not something anybody wants to have to do. Look for finishes that are made for the log home. Try to find a house in your area that has the finish you are looking at.
Beware of the 7 to 10 year warranties offered by companies. Read the fine print on how many coats of finish you need to apply to get the 7 to 10 year life out of a finish. Does the finish penetrate into the wood or lay on the surface, making it susceptible to peeling and cracking?
Remember that wood was a living organism and the cells react not much different than human skin. The finish should "breathe" to prevent a build-up of moisture under the finish. The surface needs to be protected as when you apply a sunscreen to your skin. Sunscreens with high UV inhibitors protect your skin better and the same is true with log stains.
Average Life Expectancy of Finish Types
*The Life Expectancy of Finishes is directly proportional to the amount of direct sunlight the finish receives.
** We do not recommend solid pigmented stain or paint on log, due to masking underlying issues that could lead to advanced stages of deterioration before they can be addressed.
More Direct Sunlight = A Shorter Life Expectancy.
More Shade (less Direct Sunlight) = A Longer Life Expectancy.
Get The Most From Your Log Home Finish
If logs or lumber are very shiny, a barrier such as a milling glaze could exist, preventing absorption. Sand or media blast surface before applying finish.
If you plan on using a preservative, such as Tim-bor or Boracol, apply it first, then apply the finish.
Clean the log surfaces of any dirt, oil, or bark, which can reduce absorption and shorten the life of the finish.
A pigmented finish will normally out-perform a clear one because pigment works as a sunscreen to keep the wood from graying.
Apply the recommended number of coats to increase UV protection.
If spraying the finish, back-brush for proper adhesion.
Apply the finish at temperatures in the range of 50°F to 90°F. Surface temperatures below or above this range can hinder absorption and shorten the life of the finish. Wind and direct sunlight can also dry a finish too quickly.
Apply a new coat before the previous coat is totally broken down by the weather.
Caulk large upward facing checks so that water is not absorbed by wood. Retained moisture can interfere with the adhesion of the finish.
If you are doing log repair and adding half-log facing or crowns, think about using PeneTreat (Tim-bor) for spraying those new sections and notches. This will help prolong the life of these replacements. PeneTreat can also be applied in dry form when caulking upward facing checks.
Longer overhang of the eaves means less weather on the log walls and longer life for the finish.
Stains & Finishes FAQ Exterior:
See How Much Log Stain Do I Need? | Mobile Version
Context: Every structure and each side of a structure will have varying amounts of exposure to weather. Using a quality finishes one aspect of its durability, but there are five steps to getting the best performance out of your log home wood finish.
Context: It is best to choose a quality stain or finish that is made and marketed for log homes. High quality log home finishes use a combination of attributes including breathable, durable, UV resistant, and water repellent. When the log finish on an existing home is unknown, the best option is to bring it down to bare wood and start anew so that there is no mystery of compatibility. Coating removal is usually done by media blasting, sanding, or chemical stripping. Although bringing the home down to bare wood can be done by the able-bodied homeowner, it is usually best done by a trusted log restoration contractor. Ask Us! For some names of contractors who serve your area. Although it is ideal to bring an old finish down to bare wood when starting with a new system, it is not always a viable option due to budget, time, or ability. If applying a new log finish over an unknown existing one, there are at least three factors to consider when choosing a finish for your log home.
1. The first consideration when choosing your log home finish is compatibility. If you have new construction or an existing home stripped down to bare wood, you have a clean slate to begin and options are open. If there is an existing stain on the logs in decent condition, it’s best to continue maintenance coats with the same product or another product of similar chemistry. If there is an existing stain on the logs in decent condition, but it is unknown what product was used by a previous owner, then testing a new stain is critical before committing to full application. When in doubt, it’s best to bring the logs down to bare wood and start anew. When that is not a viable option, mostly due to effort and cost, then it is best to narrow down the choices and test for adhesion in a discrete area. Ask Us! for Sashco’s free Log Home How-To & Product Guide, which gives a more comprehensive guide to switching between coating formulas.
2. A second consideration to choosing an exterior wood finish is the type of finish best for the exposure of the structure. Penetrating finishes are generally more breathable and preferred for areas like cedar shingles, wood decks, and other structures that see big swings in moisture and freeze-thaw cycles. Other coatings maybe be slightly less breathable but will offer superior surface protection to guard against UV damage in sun-exposed areas. Rather than thinking about stains as a dichotomy of oil vs water, according to Sashco’s Log Home How-To & Product Guide, it’s better to look at wood stains as more of a trichotomy of deep-penetrating non-drying oils, shallow-penetrating drying oils and hybrids, and surface-dwelling water-based stains. Each coating type has its pros and cons in different applications. Ask Us! For assistance in narrowing down your log stain options to product type.
3. A third consideration to choosing an exterior wood finish is the various preferences of the owner: aesthetic differences (color, sheen, general appearance), maintenance schedule (frequent but easy vs less frequent but touchier), preferences of soap and water vs solvent clean-up, are a few factors that will vary by the homeowner. Cost is also a homeowner’s preference: Premium quality log home stains will typically last longer, but cheap stains may require more frequent reapplication.
In short, with many factors to narrow down the best choice, contact us with the details about your structure for suggestions on the best options for your log home finish. Request our free catalog, Sashco’s free Log Home How-To & Product Guide, and other helpful literature resources we carry. Once you’ve narrowed your choices, Ask Us! for samples of the products to test the actual on your wood for both appearance and compatibility.
Context: Stains/finishes/sealers for exterior wood are protective, sacrificial coatings that need periodic reapplication.
It depends on your definition of "natural": a fresh cut color or graying out of logs. All stains available have light colors to choose from for a fresh cut look. What would be recommended is how "natural" the customer wants to get i.e. a personal preference. Examples include: Capture Natural, Sansin Classic Wheat or Light Natural, and WeatherSeal Natural Pine. Applying a UV protection primer can help boost the performance of a light, natural finish. Consider Colorfast before applying Capture Natural or Sansin Classic Foundation before applying Classic Wheat. LifeTime and Q8 Log Oil are available for the natural gray weathered look.
Context: Much of a log coating’s UV protection to wood comes from the pigment itself.
Considerations: If you use only a clear coat on bare wood, in most cases you can expect an extremely short life of performance (6 months- 1 year). Variables affecting the service life of the finish include the amount of exposure of the structure to sun and weather, the quality and type of the coating.
If graying of the wood is acceptable for the project, then you may consider penetrating clear finishes. (e.g. waterborne Sansin Woodforce Clear, or oil based Outlast Q8 Log Oil 00 Clear, OrganiClear WR5 Clear, WoodGuard Clear.)
If you are looking to keep a non-gray, fresh and natural wood appearance, then consider a stain system with a natural color maintained with a clear coat (e.g. Capture Natural + Cascade Clear Coat, Transformation Siding & Trim Natural + Cascade, Sansin SDF + ENS Optimum Clear). Light natural wood colors may perform even better with a pre-stain primer (e.g. Colorfast, SDF Foundation Light Wood) to stabilize the lignin of the wood. Expect to maintain the clear topcoat in approximately 3-5 years, depending especially on the extent of sun exposure.
Context: There are some benefits to solid stains or paint on log homes, including superior UV protection compared to semi-transparent stains. Solid stain or paint also easily achieving a uniform appearance when re-coating over existing, unevenly weathered finishes. While the extra pigment in solid stains and paints may allow a coating to last longer in sun exposure than semi-transparent finishes, we generally do not recommend solid stains on log homes due to several drawbacks.
Context: Many historic log structures were built with tightly grained, old-growth hardwood species that are naturally resistant to rot and last a century untreated. They can still benefit by keeping water out of the wood, leading to extended life of the structure. The graying color seen in weathered wood is an indication of UV damaging the lignin and consequently weakening the cell structure of the wood in the top layers. Surface finishes only penetrate a few cells deep and so if the wood cell structure is degraded, the finish will not have a solid bond to the wood and may be more likely to peel.
Context: Many historic structures can stand for long periods, even without having a finish. Part of their resilience is due to being built from rot-resistant species, as well as the use of old growth wood, featuring tighter grain and greater heartwood, to be naturally resistant to rot. The common practice of hewing logs into square timbers also would allow dovetail cabins to shed water more readily. New log homes are often built with faster growing trees, and often with species less naturally resistant to decay.
Context: The cell structure of wood resembles a tight bundle of straws, designed to carry water and nutrients through the life of the tree. Therefore, the exposed end grain is exponentially more absorbent to water than the sides and should be sealed. There are two reasons to seal the end grain of wood: 1. to reduce checking of new wood in the drying process by slowing the rapid loss of moisture out the end grain. 2. To prevent decay in a wood structure by limiting the absorption of water through the end grain.
To protect you log ends:
Context: Of course, our passion is for logs, timber, and real wood siding, but we understand many people are using synthetic building materials to simulate the beauty of wood- especially on structures like dormers, gables, and trim on their log home.
Typically a film-forming finish is the best choice of wood stain for non-wood substrates. Some of the options we carry are Capture/Cascade, Sansin ENS, NatureOne Acrylic. Always try a test area first, allow it to dry, and test it for adhesion.
Context: When applying a new wood finish over a different, existing stain, it is best to test for compatibility before applying the product to the entire structure.
Note: It’s best to do the testing of stain for adhesion and color preference on a back wall or a discrete corner—not in highly visible areas like next to the front door.
Stains can be mixed if they are the same product. Mixing oil and water based stains will not work. Mixing is not recommended because of the difficulty of duplicating the same mixture for re-coating at a later date.
Many of the stains we carry can be sprayed. Even the thickest one, WeatherSeal, can be sprayed by using a .015 to .017 nozzle. Back brushing is important. Back brushing the stain forces it into the wood to give a uniform finish and helps to ensure adhesion. Some stains can be applied with a garden pump sprayer, others may require a heavy duty airless sprayer. Consult the application guide for the choice of stain for details specific to the product.
All of our exterior stains and finishes are quality products. It is important that you choose the product that will work best for you. If you need assistance after looking through our products (See Exterior Finishes), give us a call and one of our customer service representatives will help you choose a product that is best for you. 1-800-359-6614.
We do not recommend using exterior finishes on the inside because most exterior finishes contain biocides or insecticides that do not affect personal health when used on the outside, but with today's tendency to have more air efficient homes those products could affect personal health when applied to the interior of the home. There are some exterior stains that can be used on the interior, especially if they are sealed with an interior top coat. Examples would be Capture or Transformation Siding & Trim sealed with Symphony Interior Wood Finish, or Sansin SDF sealed with Sansin Purity Clear.
Rather than thinking about finishes as oil based or water based, consider a trichotomy of deep-penetrating stains, shallow-penetrating stains, and surface stains. They all have their advantages and disadvantages and one might be a better choice than the others in different situations. Deep-penetrating, non-drying oils finishes (such as Outlast Q8 Log Oil) are breathable, forgiving, and will never peel, but they can potentially cause adhesion failure with water-based caulk or chinking. Deep-penetrating stains are often good choices for decks, shakes, shingles, and railing. Shallow-penetrating finishes (such as Sansin SDF or Transformation Siding & Trim) are typically drying oils or water-born hybrids. They can be breathable and are more compatible with sealants than deep-penetrating oils. Surface finishes (such as Capture/Cascade or Sansin ENS) often give the best protection from sun exposure, but are less forgiving. It’s possible they will peel if preparation is neglected or if they are let to go too long between maintenance coats. They are typically very compatible with sealants like water-based caulk and chinking.
No, they will not change the color, though Bug Juice will significantly reduce the transparency and gloss of Lifeline Advance Topcoat.
All of our stains and finishes will work. For a natural cedar look we recommend Transformation Siding & Trim Natural, Sansin SDF Wheat, or Outlast Q8 Log Oil Medium Gold.
Yes. At least the first coat of stain applied before caulking or chinking is often recommended. We aware that deep-penetrating oils never fully dry and may potentially lead to adhesion failure of sealants-- especially water-based caulk or chinking.
The best average temperature should be 40°F and rising or 90°F and falling, but check the product Data Sheet to be sure. If it is 50°F for an hour or two a day in the Fall and 30°F at night you probably should wait, the product won't cure properly. Also, surface temperature is more pertinent than air temperature. The air might read ideally at 60°F, but in direct sunlight the surface could be well over 100°F and not suitable for product application.
Outlast Q8 Log Oil, WeatherSeal, Woodguard, WR-5, and X-100 have preservatives in them that insects don't like. You can also add Bug Juice to other stains and finishes to help fight insects. Consider applying a borate preservative before your finish for added insect resistance. Topical products, such as Bug Bee-Gone or Viper can also be over a finish, but may need periodical reapplication as rain washes off.
Interior:
Context: Finishing the exterior of a log home is essential to protect the wood from water, weather, insects, and decay. Finishing the interior is optional, but highly recommended.
Adding color with an interior stain to your logs, is optional, but sealing them with a finish is highly recommended. Most homeowners prefer the natural look of wood on the interior, while others might brighten it with a pickled white stain or add depth with various browns or other hues. While changing the color of the wood.
Context: Most of the interior clear coats we carry offer two options: Gloss and Satin (or Matte). In some cases, people are looking for a level of sheen that is somewhere in between two choices.
See Interior Finishes and Floor Finishes.
Other:
See Deck Finishes.
Click here Log Furniture Finishes.